
7 Simple Yet Powerful Asana Automations You Can Set Up Today to Streamline Your Workflow

We all dread the repetitive but necessary tasks that eat up a significant chunk of our workday. In the US, nearly 89% of workers admit to wasting about 2.9 hours every day on such tasks. Workflow automation has become a convenient and effective solution to solve this issue, with 66% of professionals reporting increased productivity now that they can focus on work that matters.
If you've yet to tap into the power of Asana's Rules feature, consider this your prompt. Here are 7 straightforward but effective automations for your Asana workflows that are designed to trim minutes off your work day and help you stay focused.
Automating Task Assignments
Quick and efficient task delegation can save you and your team a lot of time and improve overall collaboration. One handy automation in Asana allows you to assign new tasks automatically based on specific criteria. Here's how to set it up:
Click "Customize" in your Asana project’s toolbar.
Select "Rules" and then click on "Add Rule".
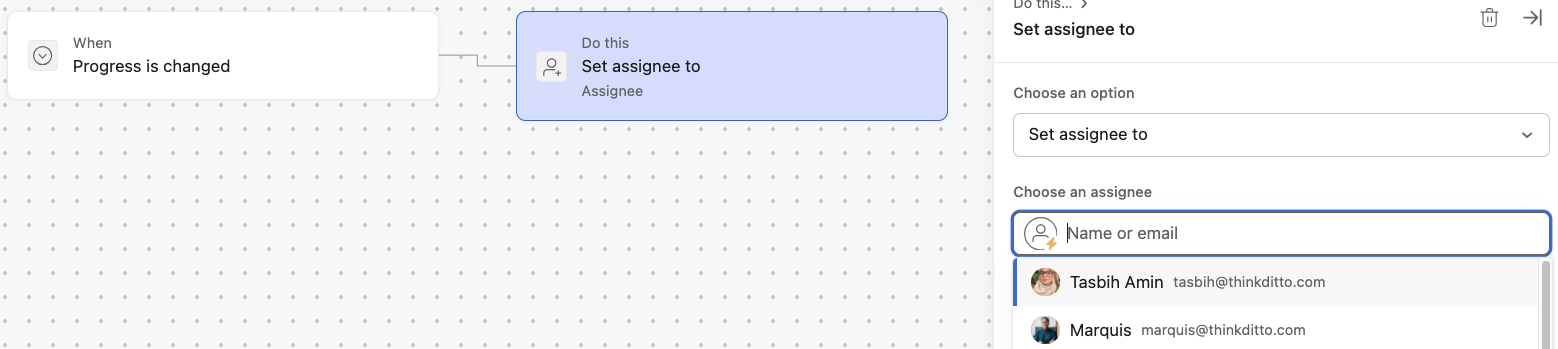
Choose a trigger that fits your need, for example when a task’s “Progress is Changed”. (you’ll need to have the custom field for progress previously set up.)
Click on “+ Do This” to add action.
Select "Change assign to" and then choose the appropriate team member.
Rename your rule and then click "Publish Rule".
This automation streamlines your workflow and reduces manual task management with immediate assignment of the right person to the right task.
Changing Due Dates

Asana allows you to automatically adjust due dates, which helps tasks stay aligned with changing schedules.To apply this automation, you:
Click "Customize" in your project toolbar and select "Rules".
Click "Add Rule" and choose a trigger that fits your scenario, like "Task moved to a certain section".
For the action, select "Set Due Date" and specify the adjustment needed, such as 'Add 4 days'.
Click "Publish Rule".
Moving a Task to a Different Section
Organizing tasks into specific sections in Asana can greatly help you manage your workflows more efficiently. Let's say you're managing a software development project. You can automate the process of moving a task to different sections based on its progress. For example, if the status of a task is changed to “Quality Assurance”, the task automatically moves to the “In Review” section. Here’s how you do it:
Create sections in your Asana projects.
Click "Customize", “Add Rule” and then “Create Custom Rule”.
For the trigger, select “Task completion status is changed.”
Select the status for the trigger, for instance “Quality Assurance”, under “Check If”.
Finally, choose the section you want the task to move to (in this example, ‘“In Review”).

Creating Subtasks

You'll find many tasks in your project that consistently require the same subtasks. For example, every time a task moves to the "In Review" section, you might need to create follow-up tasks such as "Gather Team Feedback", "Implement Design Revisions", and "Final Approval". Here's how to automate this in Asana:
Click "Customize" in your project toolbar and select "Rules".
Click "Add Rule" and choose the trigger when “Task moves to section”.
Add “Check if” condition and select “Task is in section”.
Select the section you require for this automation. For this example, it’s “In Review”.
Click “+ Do this” to add action and choose “Create Subtasks”
Write the subtasks you want to auto-generate.
Click “Publish Rule".
Sending Deadline Reminders

Missing a deadline can disrupt your entire workflow, and this simple Asana automation can help you keep track. You can set up automatic reminders for upcoming task deadlines. These can be emails or Slack messages, and you can set them as follows:
Open your Asana project and select the task you want to set a reminder for.
Assign a due date to the task.
Go to the "Customize" button in your project toolbar and select "Rules".
Click on "Add Rule" and choose the "Due Date Approaching" trigger.
Set the time frame for the reminder (for example '1 day before'.)
Click on “+ Do This” to add action.
Choose "Send Email" or “Send Direct Slack Message” action or any other way you prefer to be notified.
Rename your rule and click "Publish Rule".
Updating Custom Fields for Overdue Tasks
Sometimes, you’ll find yourself in situations where tasks miss their deadlines (despite the cool reminder automation we applied earlier). A useful Asana automation is updating a custom field when task statuses change. If a task misses its deadline, you can have its status automatically updated in the custom fields. Here's how:
Create the custom field "Status", with options like "On Track", "At Risk", "Overdue", and "Completed".
Click "Customize" in your project toolbar and select "Rules".
Click "Add Rule" and choose the trigger when “Task becomes overdue".
Click “+ Do this” to add action and choose “Change Status to”.
Select option to "Overdue".
Save the Rule by clicking “Publish Rule”.
By automatically flagging overdue tasks in your project, you can immediately identify and address delays and ensure the project stays on track. You can get creative with this automation by experimenting with various triggers and custom fields that go beyond just tracking task status.
Adding Comments to Tasks
Creating clarity in your project workflow is crucial, and automatically adding comments to tasks in Asana can significantly help with this. If a task's status changes, or moves through different sections, or is assigned to a specific person, a comment can be auto-generated to clarify these updates.
Go to "Customize" and click on "Rules".
Click "Add Rule" and choose the desired trigger, like a status change, task movement, or new assignee.
Click “+ Do this” and choose the action “Add a comment to task".
Write a standardized comment that provides clarity on the update or instructions for an assignee (you can also @mention people in the comment.)
Save the Rule by clicking “Publish Rule”.
This is a great way to relay information during every significant change to a task and helps keep everyone on the same page.
By combining all these rules, you can create a seamlessly automated workflow in Asana, where tasks are dynamically assigned, scheduled, and organized through each stage of your project. Be creative and experiment with different automations to see what works best for your specific needs. Every project is unique, so fine-tuning your approach is key to finding the most efficient workflow.
And if you're still new to Asana and need help capturing workflows and automating them, don't hesitate to book a call with me. As Asana partners, we’ve helped many teams like yours adapt Asana to their needs and get the most of its powerful features.